
Grading is the critical first step that lays the groundwork for every commercial real estate construction project. While it may appear to be simple earthmoving, grading is a fine process that prepares the land for safe construction, directs water away from structures, and sculpts the land to fit a project’s unique needs. According to the U.S. Environmental Protection Agency moisture control guide, improper site drainage can cause water from rain and snowmelt to damage foundations.
Whether it’s for a high-rise office building, residential complex, or an industrial facility, civil engineers and contractors must develop an effective grading plan to ensure a solid foundation.
If you are looking to build a new commercial building or revamp your existing one, this blog will explain everything you need to know about construction grading.
What is Grading in Construction?
Grading in construction, also known as land grading, is the work of levelling and sloping the construction site to ensure proper drainage, achieve desired contours, and establish a solid foundation for a building project. Grade refers to the ground level or the elevation at any given point.
The fundamental goal of land grading in construction is to:
- Provide a stable and secure foundation for the building
- Ensure proper surface drainage
- Protect the environment by avoiding soil erosion, stormwater runoff, and pollutants
- Establish allowable height and depth of cuts and fills
- Comply with local building codes, zoning regulations, or other standards
- Improve the aesthetics of the finished project
Grading land creates a level base for a new building or structure while addressing drainage problems. In existing buildings, site grading focuses on refining their landscaping features and increasing curb appeal. Meaning that grading in construction is both a preventive and preparatory technique.
Who Performs the Grading Work?
Site grading is typically performed under the expertise of specialized engineers and grading contractors. They use heavy equipment like motor graders, bulldozers, wheel tractor scrapers, skid steer loaders, and other machinery for the job.
Grading in construction involves contractors developing a “grading plan” based on existing site conditions, according to which they reshape the land for utility lines installation and foundation laying.
Excavation vs. Leveling vs. Grading: What’s the Difference?
Oftentimes, the terms excavation, grading, and leveling are confused. Although all three involve moving or shaping soil, the purpose of each site preparation process is different.
Excavation is the process of removing earth, rock, or debris to create space below the existing ground level. The land is excavated before construction and is used for foundations, basements, utility trenches, swimming pools, drainage channels, and other below-grade work. However, excavation is not always necessary for a commercial construction project if site grading prepares the land adequately.
Grading usually follows clearing or excavation. Instead of simply removing soil, grading reshapes the land to create planned slopes, elevations, and contours. Proper grading improves drainage, supports structural stability, and prepares the site for buildings, driveways, or landscaping.
Leveling is the process of creating a flat, smooth, and even surface by cutting high areas and filling low spots. It is one of the final stages of land preparation and is typically used for patios, walkways, concrete slabs, lawns, and any area that requires a stable, uniform finish.
Hence, excavation removes material, grading shapes the land, and leveling creates a smooth, even final surface.
Importance of Grading in Construction

Land grading in commercial construction projects is beneficial not just for the building site but also for neighboring properties and the environment. Here’s why:
Provides a Stable Foundation
A leveled ground evenly distributes the weight of the building, preventing any foundational shifts or settling, which may cause structural damage or collapse. By contouring the land strategically, grading reduces soil erosion and provides a solid base for the construction of foundations, buildings, and roads.
Introduces Drainage Patterns
Graded land minimizes the risk of water accumulation in undesirable areas, which can cause foundational damage over time.
With proper site designs, water can be directed away from the building into the drainage systems. Grading in construction also stops water from running into neighboring properties, saving the owner or builder from liability issues.
Defines Building Aesthetics
Creating high points and low points at the right places in the build is extremely important for achieving the desired landscape. Grading contractors plan elevations and levelling that can complement driveways, parking lots, gardens, walkways, and overall building appearance. They reconfigure the land to make it compatible with neighboring buildings’ elevations, streets, and parking for accessibility.
Ensures Regulatory Compliance
If done right, construction grading ensures that your land complies with local building codes, zoning regulations, and environmental requirements. A detailed grading plan demonstrates that the building is graded appropriately and is safe for occupation. This will also prevent expensive legal and compliance issues.
Increases Site Accessibility and Usability
Grading can also improve the accessibility and usability of the site. By smoothing out uneven terrain and creating appropriate slopes, grading makes it easier to navigate and utilize the land, whether for construction, landscaping, or future development.
Reduces Environmental Impacts
When developing plans for commercial construction, grading engineers take erosion control, stormwater management, pollutant sedimentation, and other environmental factors into consideration. Thus, grading in construction helps reduce negative environmental impacts and follow responsible land development practices.
Construction Grading Types and Uses
Based on a construction site’s requirements, there are different types of land grading applicable for the project’s flawless execution.
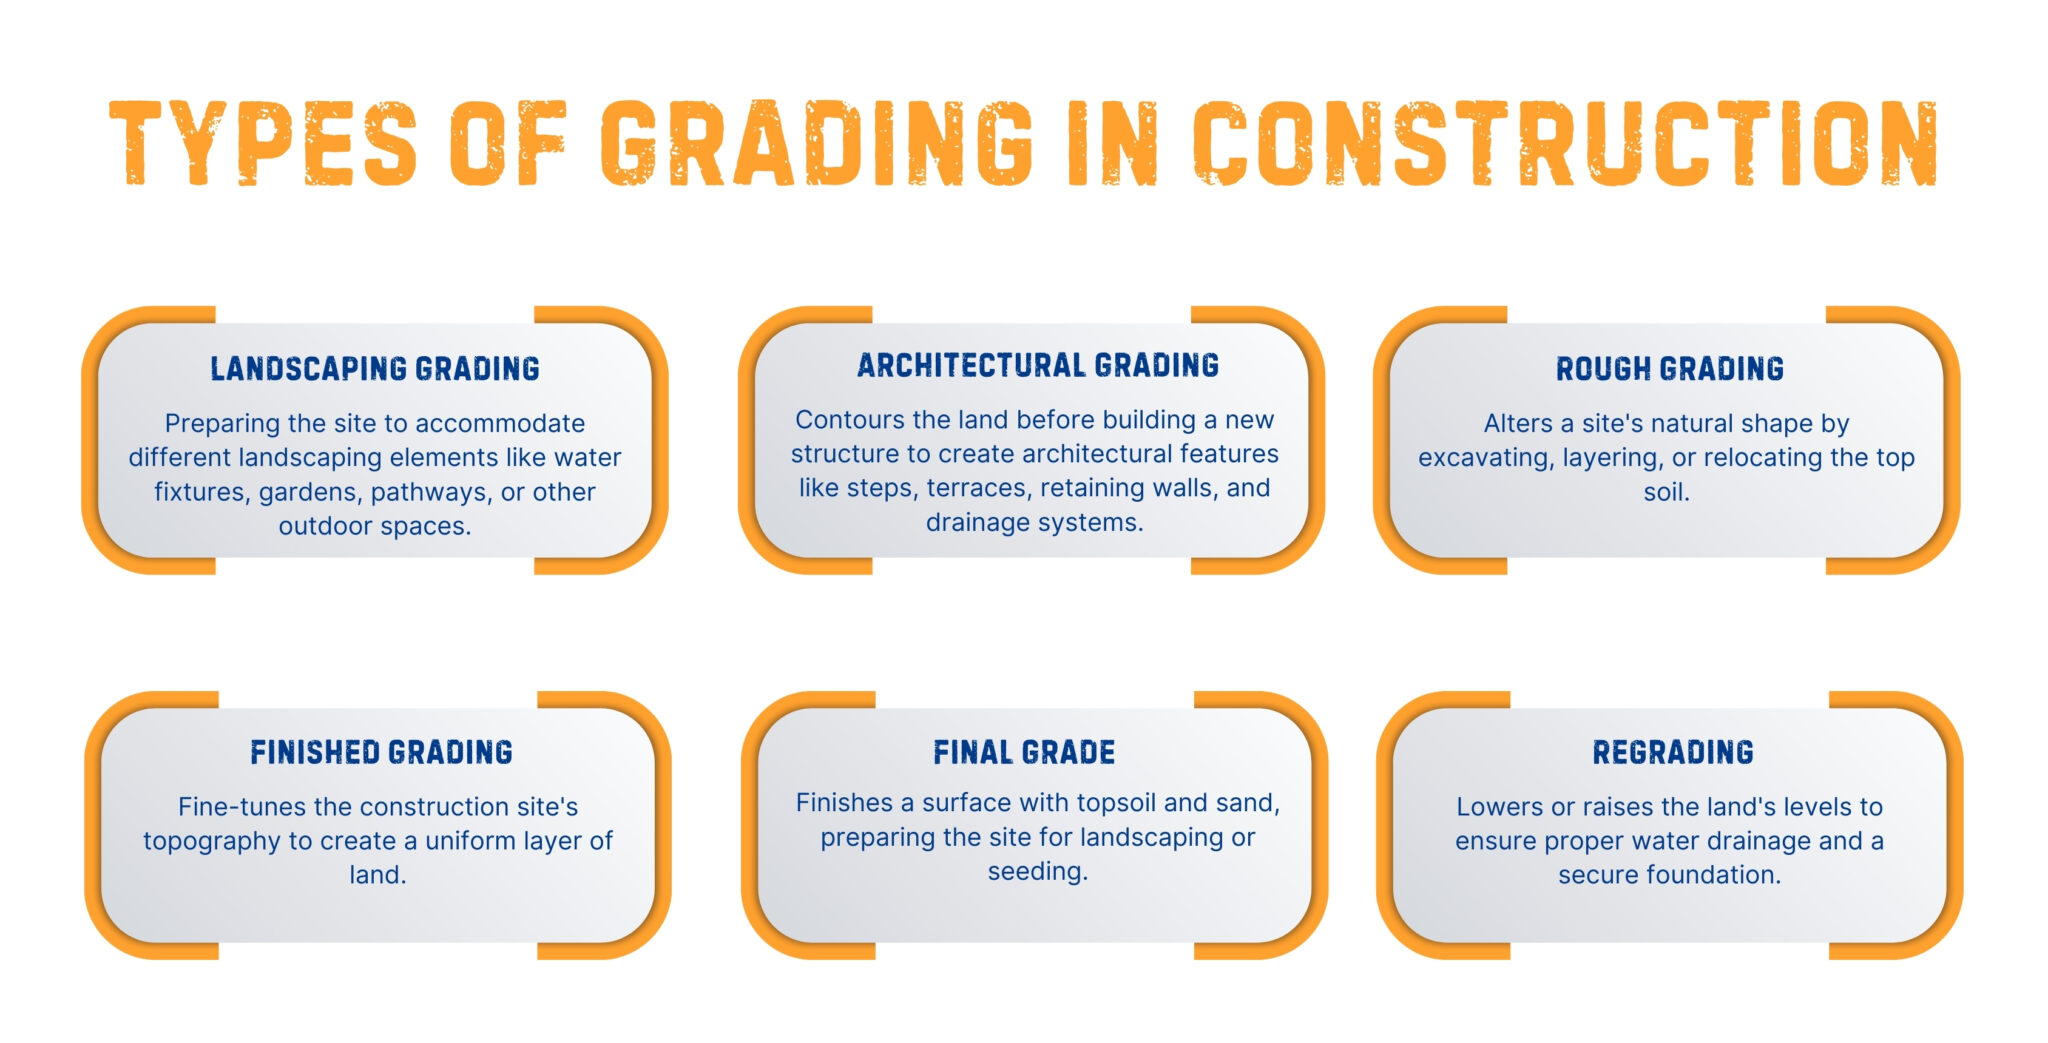
Here are the six types of grading in construction and their intended uses:
Landscape Grading
Landscape grading is the process of preparing the site to accommodate different elements of a landscaping project. For example, water fixtures, gardens, pathways, or other outdoor spaces. It may entail clearing the topsoil for setting up irrigation systems, smoothing areas for planting, reshaping slopes or elevations to improve drainage, or changing the appearance of the land.
The main purpose of landscape grading is to alter the residential or commercial site’s topography to enhance its aesthetic appeal.
Architectural Grading
Before construction, architectural grading contours the land to match the design requirements of a commercial property or housing development. This grading process removes elevations that may drain water in undesirable areas and helps prepare the foundation. It helps create specific architectural features like steps, terraces, retaining walls, and proper drainage systems.
Rough Grading
Rough grading is where grading contractors cut, fill, and level soil to shape basic site elevations and contours before finishing work begins. They use heavy machinery like bulldozers or mini excavators to scrape large portions of land and specialized tools like lasers for slopes.
The purpose of this land grading type is to set the slope or level the site for landscaping, provide a base for turf development, and establish the drainage flow.
Finished Grading
After rough grading, finished grading fine-tunes the site by removing rocks, debris, and excess soil, then precisely shaping the ground to the required elevations and slopes. This creates a smooth, uniform surface that supports proper drainage and gives the land a polished look.
Finish grading involves the use of GPS software to guide the grader by indicating the machine blade’s elevation and angle for the right pavement elevation. This type of construction grading applies to specific projects, including gravel roads and earthworks.
Final Grade
Final grade is the last step of the construction grading, where workers finish a surface by layering topsoil or sand and create a smooth, compacted foundation ready for construction. This top layer, formed by final grading, promotes plant growth and prepares the site for landscaping or seeding.
Regrading
Regrading refers to the process of lowering or raising the land’s levels. Whether a small yard project or a large commercial construction project, regrading or levelling ensures proper water drainage and a secure foundation for the building.
What is a Site Grading Plan?
Usually, municipalities require construction companies to develop and submit a site grading plan for approval before actually proceeding with the process.
A site grading plan is a construction blueprint that represents the specifics of land development and shows how the ground will be reshaped. It is developed by an architect or a civil engineer who outlines technical information for other engineers, contractors, regulatory bodies, zoning authorities, and building commissioners.
What Does a Grading Plan Include?
Here are the key components of grading plans in commercial construction:
- Property owner/applicant details, project name, site address, and intended use
- Existing site conditions (trees, utilities, structures, and topography)
- Property lines, easements, setbacks, and building envelopes
- Existing and proposed land contours and elevations
- Spot elevations, building pad, and finished floor levels
- Limits of clearing and grading, including cut-and-fill areas where required
- Existing and proposed drainage features, flow directions, and stormwater management elements
- Access points, driveways, adjacent streets, and grade tie-ins
- Retaining walls, slope ratios, and stabilization features
- Erosion and sediment control measures
Because grading plans are often complex sets of documents, many professionals now use software like AutoCAD and MicroStation to create effective grading drawings and 3-D models. These visual tools make the grading design easier to understand and help all parties involved clearly interpret the site conditions and proposed grading work.
As soon as the municipal officials approve grading blueprints, the construction process can begin.
How To Read Grading Plans?
A grading plan may look technical at first, but it is essentially a three-dimensional map that explains how land will be shaped, leveled, and drained. Here’s a simplified guide on how to read a grading plan without an engineering background.
Step 1: Find the North Arrow, Scale, and Legend
The north arrow shows site direction, the scale represents distances, and the legend explains symbols used on the plan. Find the benchmark or datum, representing the fixed “zero point” from which all site elevations are measured.
Step 2: Check Property Boundaries
Review the property lines to identify the legal limits of the site and understand where development can occur.
Step 3: Study Contour Lines
Contour lines depict how flat or steep a slope is. Wider spacing shows gentler grades, while closer spacing represents steeper slopes.
Step 4: Compare Existing vs Proposed Grades
Dashed contour lines usually represent existing ground levels, while solid contour lines indicate proposed finished grades.
Step 5: Read Spot Elevations and FFE
Spot elevations marked with “x” show existing heights precisely at points like driveways or drains, while “+” is for proposed elevations. Check the Finished Floor Elevation (FFE), which is the planned building floor level.
Step 6: Review the Drainage Arrows
Look for drainage arrows, swales, ditches, and catch basins that show how stormwater will safely move away from structures.
Step 7: Inspect Additional Site Notes
Also review cut-and-fill areas, retaining walls, utility locations, easements, and erosion-control notes for complete site preparation details.
| Symbol / Marking | Represents |
| Solid contour line | Proposed grade |
| Dashed contour line | Existing grade |
| +100.0 | Spot elevation |
| X | Existing elevation point |
| Arrow | Drainage direction |
| FFE | Finished Floor Elevation |
| CB | Catch Basin |
| MHB | Manhole |
| Hatched area | Retaining wall/slope |
| % | Slope percentage |
Sample Grading Plan
Site development engineering plan for an 8,000 square feet warehouse/office building located on a 1-acre land in Bloomington, Illinois.
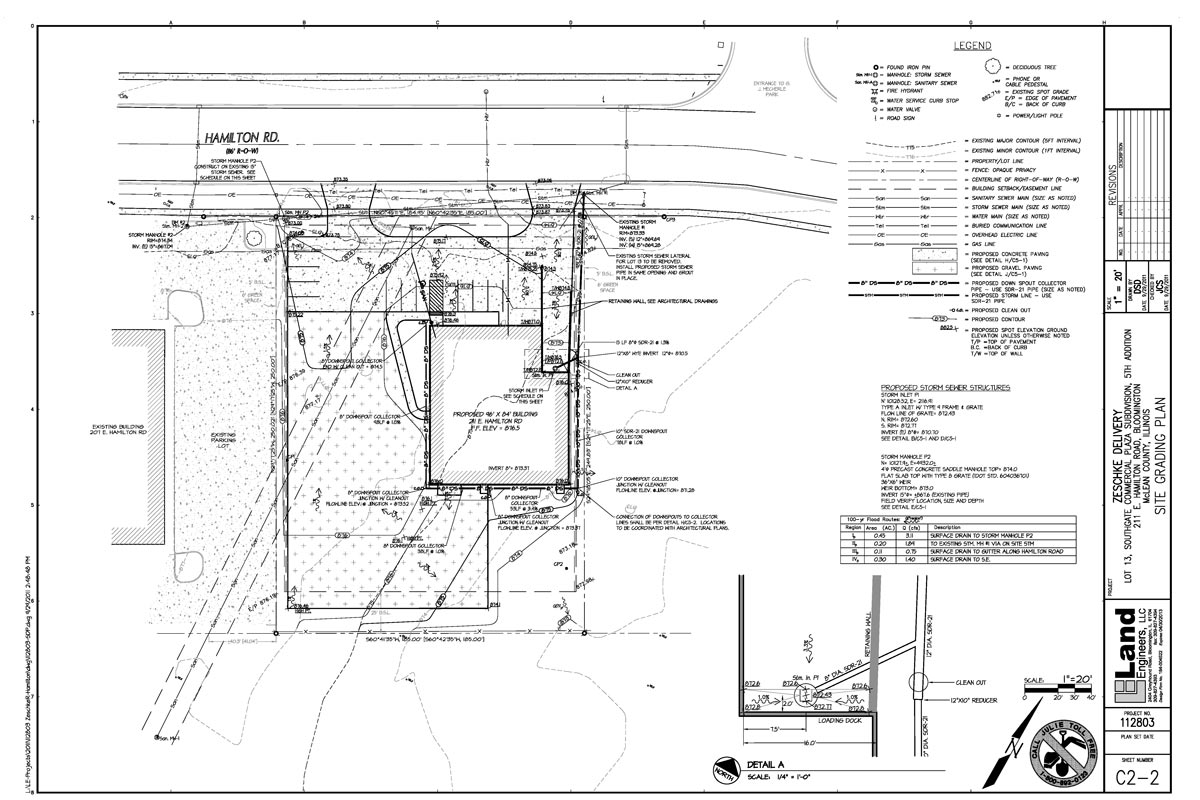
Source – Land Engineers, LLC.
How To Read This Grading Plan
This example grading plan is for Zeschke Delivery, Lot 13, Southgate Commercial Plaza, 5th Addition, 211 E. Hamilton Road, Bloomington, Illinois.
The title block confirms it is a Site Grading Plan (Sheet C2-2) drawn at a scale of 1″ = 20′. The north arrow helps you understand site direction, while Hamilton Road along the top shows where the property fronts the street.
Basic Plan Information:
- The center of the plan shows the proposed 49′ x 64′ building with a Finished Floor Elevation (FFE) of 876.5, which is the planned floor height.
- On the west side, you can see the existing building at 201 E. Hamilton Rd., along with the current parking lot.
- A note for a retaining wall marks an important elevation change beside the new building.
- Contour lines show land slope and elevation. Existing contours use 5-foot major intervals and 1-foot minor intervals, while proposed contours show the final grading layout.
- Spot elevations provide exact heights at key locations. Abbreviations such as E/P (edge of pavement), B/C (back of curb), and T/W (top of wall) label important features.
- Utility symbols identify items like manholes, hydrants, sewer lines, gas lines, electric lines, and communication lines.
- Drainage notes show where stormwater flows, including roof drains, storm inlet F1, storm manhole F2, road gutters, and southeast runoff direction.
How Much Does Land Grading Cost?
Some commercial contractors specialize in land grading, while other landscaping and septic system companies provide land grading in their range of services. Whoever you work with, ensure they are licensed, qualified, and experienced in a commercial grading project.
The average cost for grading in construction ranges from $0.08 to $2.00 per square foot, and the price to grade an entire acre is $15,800 to $44,535, with a national average of $30,000. (Source)
Usually, grading contractors will charge anywhere between $40 to $180 per hour.
Grading contractors will charge both for hourly labor and area of dirt. The cost to grade land depends on the following elements:
- Project size and complexity
- Site topography
- Specialized equipment
- Hours of labor
- Land survey costs
- Land clearing cost
- Cut and fill dirt cost
- Grading plan and permit cost
- Drainage installation cost
- Waste removal
Expect to pay on the higher end for properties requiring extensive excavation, dirt fill, boulder/tree/rock removal, or old structure demolition. On the other hand, you can save money if the land is already cleared for excavators to dig in straightforwardly.
Getting Your Grading Plan Approved
Receiving a certificate of approval for land grading plans is necessary as it indicates that the resulting elevations and drainage flows match the proposed plans. Primarily, the city department will evaluate the following factors when approving site grading plans.
1. Lot Size and Structure Coverage
Planning officials in many areas establish the maximum allowable size of space a structure can cover on a lot. This percentage in the land grading plan helps authorities determine if that requirement is being fulfilled or not.
2. Earthwork Estimates
Earthwork refers to the amount of material involved in cut (excavation) and fill (placement) work. The grading plan should clearly mention the volume of soil the construction team will remove, reuse, or import to finish the project.
3. Property Lines
Before grading and building any structure, it’s important to define property boundaries to ensure all work remains within legal site limits and avoids encroachment.
4. Utility Lines
Ensure the grading plan does not conflict with existing gas, sewer, or other utility lines, as any interference may require revisions for approval.
How to Create an Effective Grading Strategy

Successful grading strategies are based on local laws, the project’s needs, the land’s shape, and the desired outcome. While every project will have its own grading strategy, you can consider the following aspects to plan effectively.
Site Evaluation and Analysis
The first step in developing a grading plan is conducting a topographic survey of the land. This survey provides baseline information such as existing grades, slopes, drainage patterns, soil composition, neighboring structures, and any flooding or seismic risks. Using this data, the engineer will develop a grading plan that outlines the proposed grades and ensures the land safely supports the intended construction.
A proper site analysis helps determine the required grading, suitable equipment, and any site limitations. Understanding the existing terrain early helps avoid costly changes later in the project.
Set Clear Project Objectives
Before grading begins, the team should define the purpose of the grading work. For example, the goal may be to prepare land for a building pad, improve drainage, create a usable parking area, or shape the site for landscaping and visual appeal.
Setting clear objectives helps the engineer determine target elevations, slope requirements, contour changes, and how the grading work should support the overall design and function of the property.
Apply Standard Grading Guidelines
One of the most critical aspects of grading strategy is establishing appropriate slopes and elevations to direct water away from structures, prevent pooling, and protect foundations from damage.
Here are the most-followed rules of thumb to incorporate into your grading strategy:
- Compact weight-bearing soil to a minimum of 95%
- Limit parking lot slopes at 5%
- Main access drives should not slope above 8%
- Accessible routes should not exceed a 5% slope (1:20), while cross slope should be limited to 2% (ADA)
- Asphalt should slope a minimum of 1.5%
- Concrete areas and curbs should slope to a minimum of 0.75%
- Stabilized landscapes must not have slopes greater than 2:1
- Use retaining walls or other stabilizing features for steep slopes
- Minimum of 0.15m (6 inches) of exposed foundation wall from the top of the foundation to the top of the surrounding grade
- Maintain a 2% slope for the first 60 ft when designing the grade at loading docks
Following these guidelines helps create a stable, adequately drained land for construction sites.
Design for Drainage and Stability
Proper drainage is one of the most critical outcomes of grading. The strategy must direct water away from buildings (US EPA recommends a minimum 5% slope within the first 10 feet where feasible), prevent pooling, and integrate with stormwater systems.
During construction, erosion and sediment control measures must be implemented to comply with stormwater regulations. At the same time, slope design must ensure stability, especially on uneven or sloped terrain.
Consider Function and Regulatory Compliance
A grading plan must support site use, ensuring safe access, efficient circulation, and a practical layout for roads, parking, and structures.
Most projects require grading permits, stormwater permits, and approved erosion and sediment control plans before construction begins. Sites disturbing over one acre typically need a Stormwater Pollution Prevention Plan (SWPPP).
Access for disabled persons is another key consideration. The Americans with Disabilities Act of 1990 requires elevated public and commercial buildings to have accessible routes and entrances regardless of the terrain. Because of the complexity of the ADA requirements, one should consult local public works agencies for the right interpretation.
Cut Fill Analysis
An effective grading strategy focuses on balancing cut (excavation) and fill (placement) on-site to minimize unnecessary earth movement. Reducing soil import and export not only lowers hauling costs but also improves construction efficiency and reduces environmental impact.
A 2020 peer-reviewed study on optimizing earthworks across 24 road projects found that improved cut/fill balancing reduced costs by 5% to 14.1%.
Perform a Schematic Grading Analysis
Before finalizing the grading plan, the civil engineer must develop a conceptual (schematic) grading layout to test feasibility. Schematic grading analysis involves:
- Establishing building footprints on the site, along with elevations, road grades, and parking grades.
- Using spot elevations and sketching 2 or 5-foot contour lines helps assess the feasibility of building elevations.
- Compare the grade of the road and parking area to the minimum standards.
- Analyzing drainage patterns across the site.
- Preparing rough estimates of cut and fill quantities.
- Identifying steep slopes and retaining walls.
- Marking designated tree-save areas.
This early-stage analysis helps refine the grading strategy and avoid design conflicts.
Plan Construction Sequencing and Site Limits
Grading work should be phased to maintain stability. Avoid disturbing the entire site at once; instead, sequence work to limit exposed soil and coordinate grading with utilities, drainage infrastructure, and foundation construction. Clearly define limits of disturbance (LOD) in the grading plan to protect vegetation and reduce erosion and unnecessary site disruption.
Grading and Site Aesthetics
Land grading can transform a blank, featureless site into a visually appealing building that can boost property value. It can also hide undesirable elements or open up a view to influence commercial visitors. To serve this purpose, landscape grading contractors must have a thorough knowledge of the site and the right judgment on what will work.
For example, a 30-ft berm on one site is appropriate, but unsuitable for another. Similarly, a small retaining wall may serve as an attractive design feature for a building project.
Tip: Grading strategies can be quite intricate and are best planned by experienced professionals, such as civil engineers or qualified grading contractors. Without a clear strategy, teams struggle to grade the site properly, which can put the entire project at risk.
Types of Grading Equipment and Their Uses
 Grading equipment is essential for efficient and effective construction processes. Selecting the right equipment depends on factors like the amount of earthwork, site area, soil type, desired finish quality, power availability, equipment availability, and budget. Here’s an overview of the best equipment to level ground and their specific uses:
Motor Graders
Motor graders are among the best equipment to level ground, ideal for large-scale grading projects. They excel in leveling surfaces for roadwork and creating precise drainage ditches. Modern motor graders feature automation for enhanced precision and reduced maintenance needs. They are commonly used for building foundations, ditching, surface leveling, material spreading, and slope creation.
Rototillers
Rototillers are a soil-level tool perfect for landscaping projects, breaking up soil and creating smooth surfaces. They are particularly useful for preparing gardens or small plots of land.
Bulldozers
Bulldozers are powerful machines to level ground and quickly redistribute large amounts of soil. Their wide blades make them effective for site development, land clearing, and road building. Advanced hydraulic systems and fuel-saving technology ensure efficient operation across various terrains.
Wheel Tractor Scrapers
Wheel tractor scrapers are versatile grading machines for leveling surfaces, hauling, and dumping material. They combine a tractor at the front with a hopper at the back, allowing simultaneous soil cutting and collection, reducing the need for additional grading tools.
Skid Steer Loaders
Skid steer loaders are highly maneuverable with front buckets for both rough and finish grading. Equipped with over 100 attachments, they are versatile for various site preparation tasks, including backfilling and landscaping.
Excavators
Excavators are indispensable land grading equipment for digging and shaping land before grading. Available in sizes ranging from compact to large (3,800 – 188,750 lbs), their versatility makes them critical for any construction grading process.
Dump Trucks
Dump trucks transport large volumes of materials between sites or to dump yards. Off-road dump trucks with large wheels and beds are common in large construction projects, ideal for heavy hauling of dirt and debris, with models ranging from 49,591 to 69,886 lbs.
Tractor Loaders
Tractor loaders are versatile landscape grading equipment equipped with various attachments, excellent for grading. They are used for loading excavated soil, raw materials, and demolition waste. Designed to maximize productivity and reduce operating costs, they are versatile for landscape grading.
Renting land grading equipment can be a cost-effective option, ensuring you have the right tools for efficient grading and site preparation.
Step-By-Step Construction Grading Process
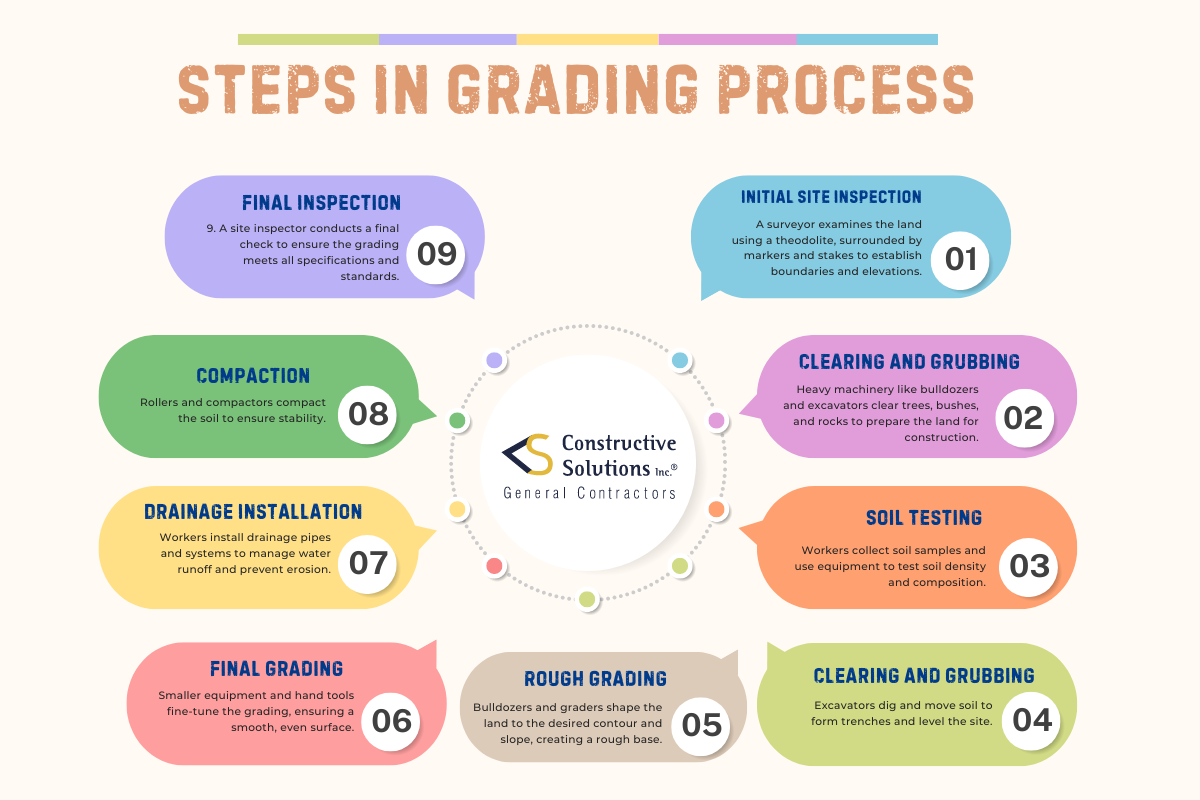
The steps of the grading process in construction will vary on the size and complexity of the project, climate, and local regulations. Essentially, the site grading process will look like this:
- Site Analysis and Planning – Firstly, a land surveyor surveys and evaluates the site’s existing topography, drainage patterns, and elevations of natural as well as built structures. This information is then analyzed to create a plan outlining proposed final grade levels and slopes.
- Permitting and Land Clearing – Grading contractors acquire required permits and approvals from local or state authorities for the proposed work. Once they get approvals, the construction site is cleared of any vegetation, debris, rocks, or old structures.
- Erosion and Sediment Control – Contractors install measures like silt fences, check dams, inlet protection, slope drains, and temporary seeding or mulching to control soil erosion. Limiting exposed soil helps prevent runoff issues and regulatory violations.
- Cut and Fill Operations- Heavy equipment like bulldozers, excavators, and motor graders excavate higher points and fill in lower points, levelling the surface. Reshaping land helps to achieve required contours and slopes.
- Compaction – Compactors or rollers compress the soil to increase the density and strength of the graded surface. Hence, it establishes a solid foundation for upcoming commercial construction projects.
- Final Grading – After rough grading, tools like skid-steer loaders and laser-guided equipment perform the final grading process. It helps create accurate grade levels and slopes for the construction project.
- Drainage Installation – Grading contractors study natural water flow patterns according to which they install drainage features like slopes, swales, culverts, and retaining walls.
- Quality Control Inspection – A professional engineer inspects the graded land to certify that the work meets quality standards and regulations.
Once approved, the graded site is ready for foundations, paving, utilities, and landscaping.
Common Challenges in Grading and How to Overcome Them
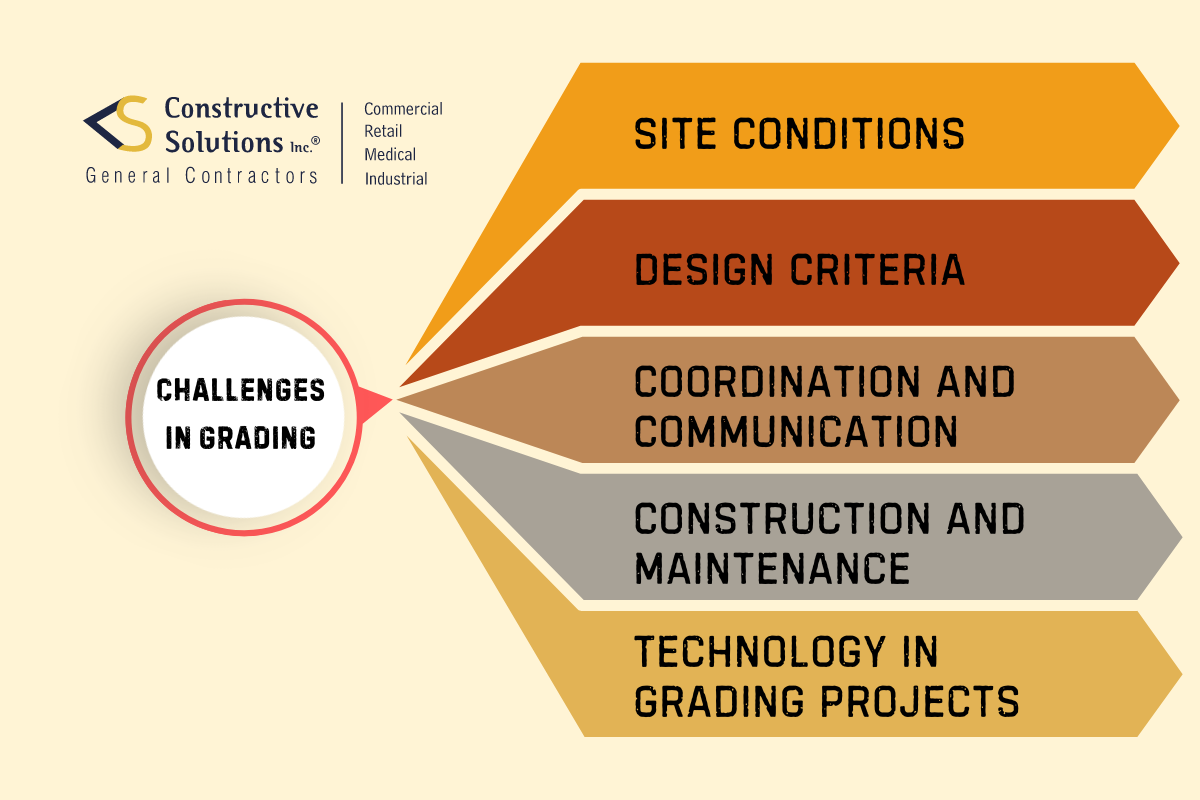
Let’s explore the most common challenges faced during grading and earthwork projects and strategies to handle them.
Site Conditions
Assessing and adapting to existing site conditions is a primary challenge in grading. Variations in soil type, topography, drainage, and vegetation can significantly impact the design. Conducting site investigations, including geotechnical surveys and hydrological studies, can help in planning proper drainage systems.
Design Criteria
Meeting design criteria requires compliance with building codes, standards, and client specifications. Balancing technical needs with budget and aesthetics is challenging. Staying informed about local zoning laws and industry best practices, using robust project management techniques, and maintaining open communication with stakeholders helps align the project with regulatory and client expectations.
Coordination and Communication
Misunderstanding among stakeholders, including architects, engineers, and contractors, can result in costly errors. Regular meetings, clear documentation, and the use of collaborative tools and software can improve communication and reduce the risk of discrepancies or delays.
Construction and Maintenance
Ensuring that the grading design is executed correctly during construction and can be maintained over time is another challenge. This requires quality control practices like detailed construction documents and regular site inspections. Post-construction, establishing a maintenance plan helps in resolving potential grading issues.
Technology in Grading Projects
Sometimes, keeping up with technological advancements becomes difficult for civil engineers. Modern tools like CAD, GIS, BIM, drone surveying, and machine learning can ensure grading precision and streamline workflows. Embracing green building solutions and sustainable materials can lead to an eco-friendly grading process.
Safety Compliance
Maintaining safe grading operations can be challenging because crews often work with heavy equipment such as bulldozers, excavators, and motor graders. Proper safety training, use of PPE, clear barriers, and warning zones help reduce the risk of equipment accidents and on-site injuries. Routine soil stability checks are also important to prevent collapses.
Summing up
Grading in construction is a prerequisite to the success of both new and existing commercial building projects. It provides site stability, addresses drainage issues, ensures regulatory compliance, and improves the aesthetics of the finished structure. That is why you must prefer working with expert grading contractors who can create an effective plan and implement it masterfully.
Choosing the right sitework partner matters from day one. With a proven track record, strong safety standards, and local regulatory expertise, Constructive Solutions, Inc. helps set your project up for a smoother, more successful start. Get in touch today.
FAQs
What is grading in civil engineering?
In civil engineering, grading is the design and construction process of adjusting ground levels and contours to support buildings, roads, drainage systems, and safe land development.
What’s the difference between rough grading and final grading?
Rough grading shapes the land by cutting, filling, and leveling soil to create basic elevations and drainage. After rough grading, final grading removes debris, adds topsoil, and precisely smooths the land to the required slopes and finished levels.
How can grading help in construction?
Grading in construction helps by creating a level base and enabling builders to direct water runoff from the site. It also impacts proper functioning of irrigation and drainage systems.
How long does grading take?
The duration of grading varies based on project size and complexity, typically ranging from 7 days to 3 weeks.
What is the difference between leveling and grading?
Leveling creates a flat, even surface by cutting high spots and filling low areas, while grading reshapes land to planned slopes and elevations for drainage, stability, and site design.
What is the process of grading?
The grading process typically includes:
- Site survey and planning
- Land clearing
- Cut-and-fill earthwork
- Soil compaction
- Final grading and shaping
- Drainage installation
- Erosion control measures
- Quality inspection and approval
Is grading the same as excavation?
No, excavation removes soil or rock to create below-ground spaces like foundations or trenches, while grading reshapes the surface land to proper levels and slopes.
What are some potential drawbacks of construction grading?
Here are some disadvantages of grading in construction:
- If grading disrupts existing drainage patterns, it can cause the pooling of stormwater and damage the building.
- Unsettles the natural environment and wildlife habitats.
- Reshaping slopes can sometimes lead to safety hazards.
- Expensive machinery and labor.
Relevant Resources:
- Land Development and Permitting: Get the Facts Before Your Project Starts
- The Commercial Construction Process In 10 Steps
Constructive Solutions, Inc. is a full-service commercial construction company serving San Francisco and Bay Area.
Whatever your vision, we have the resources, experience, and insight to make your concept a reality, and a space where your business can flourish.
Call Us Now for Estimate


Leave a Reply